
Apply Custom Settings for Users or Groups (Administrator)
Admins can apply custom settings for users and groups.
View user details
| User details | Elements |
|---|---|
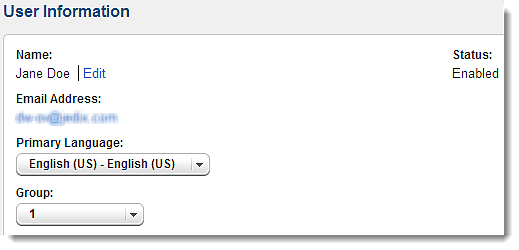
| User Information |
|
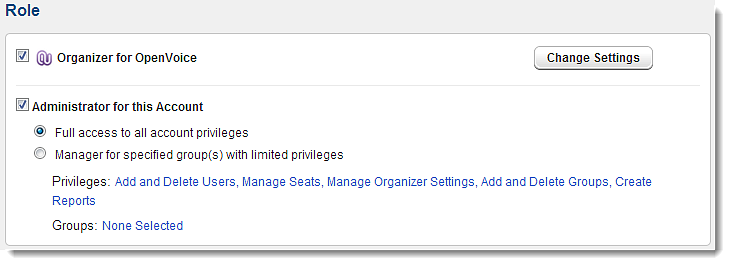
| Role | You must select at least 1 role for a user before you can add them. You can assign the user an organizer role, account administrator role (with full account privileges or a manager for groups) or both. To add role privileges, administrators can click the Change Settings button, which will direct them to the Manage Users page where they can change the setting for a particular product’s feature. You can select the limited privileges by clicking the hyperlinked privileges and selecting the check boxes. Click Apply to save your selection. Similarly, you can click the Groups link to select the groups you want the user associated with. Click Apply to save your selection. |
| Product Usage | You can view the organizers’ conference room number here. If you’ve made any changes to the user’s details, click Save to apply your changes. |
Add Custom Fields
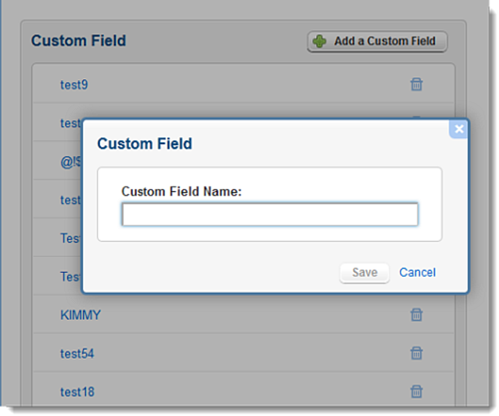
Admins can also define custom fields (e.g., attributes) that will appear on the User Details page for each user on their account by clicking Admin Settings in the left menu, scrolling to the "Custom Field" section and clicking Add a Custom Field (the custom field can include numeric and alpha characters). When an administrator views the User Details page for a user on their account, they will see the new field. The new field will also be included in the search results when an admin performs a search on the Manage Users page, so that all users with that defined attribute will appear.
- To edit a custom field, admins can click the name of the field, make the desired changes and click Save.
- To delete a custom field, admins can click the Trash icon
 next to the desired field.
 Once finished, you can move on to
Step 2 – Change Settings.
Once finished, you can move on to
Step 2 – Change Settings.
Select Users or Groups (Administrator)
- Use the Filter by drop-down menu to choose from All Users, All Administrators, All Managers, or Un-Grouped Users to manage settings. You can also choose users based on the seat or group to which they belong.
 Note: You can also search for the user's name or email address in the Search field.
 - Existing settings for users are displayed in your filtered results. You can use the Show Features drop-down menu to display up to 4 settings/features at once. These settings/features in the drop-down menu will change as you switch between products.
