
How do I set up GoTo Room with Logitech Rally?
Use the following information to successfully set up your Logitech Rally device.
Unpack your equipment
Items and accessories included in the GoTo Room onboarding kit:
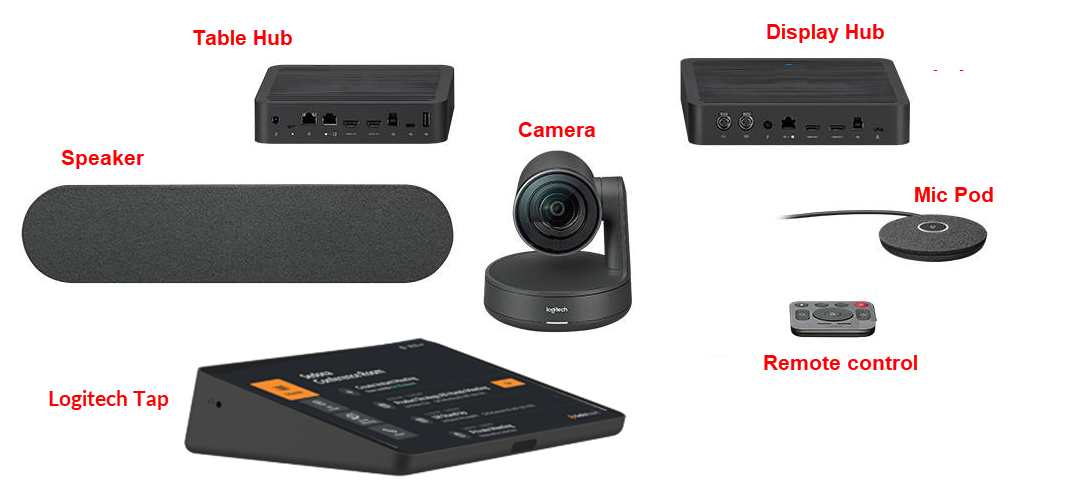
- Logitech Rally Camera - Webcam device to broadcast the room to other attendees.
- Logitech Rally Speaker - Audio device to broadcast session audio.
- Logitech Rally Mic Pod - Audio device to connect to VoIP audio.
- 9' cable
- Logitech Tap - Mini display to start and join meetings and manage in-session features.
- 9' power cable and adapters
- 32' Logitech Strong USB cable to connect to the Intel NUC
- 6' HDMI cable
- Wall mounting screws (optional)
- Intel NUC - Mini computer to run or join the GoTo Meeting session.
- Power cable
- Logitech remote control - Device to control camera (pan, tilt, zoom) functions during meetings.
- Logitech Table Hub
- Logitech Display Hub
Other accessories included in the kit:
- Two A/C power cables for the display hub and the table hub
- 6.5' USB C to C cable that goes from the camera to the display hub
- 6.5' USB A to B cable that goes from the display hub or table hub to the Intel NUC
- 16' ethernet cable that goes from the display hub or the table hub to the network
- 9' mini XLR cable that goes from the display hub to the speaker
- Two 6.5' HDMI Type A cable that goes from your TV monitor(s) to the Intel NUC
- CAT6A ethernet cable that goes from the display hub to the table hub
Additional requirements:
- Two display screen (monitor or television) capable of 1920x1080 resolution or one display up to 4K
- Ethernet cable for the Intel NUC
Set up your equipment
(a) Logitech Display Hub
- Use the included power cable to connect the display hub to an outlet.
- Use the included USB-A cable to connect the display hub to the Intel NUC.
- Use the included USB-C cord to connect the display hub to the camera.
- Use the included CAT6A ethernet cable to connect the display hub to the table hub.
- Use the included mini XLR cable to connect the display hub to the speaker.
(b) Logitech Table Hub
- Plug in the power cable to an outlet.
- Use the included cable to connect the table hub to the mic.
(c) Logitech Tap
- Plug in the power cable to an outlet.
- Use the included Logitech Strong USB to connect the Tap to the Intel NUC.
(d) Intel NUC
- Use the included HDMI cable to connect the Intel NUC to your display.
- Use the included power cable to connect the Intel NUC to a power outlet.
- Use an ethernet cable to connect the Intel NUC to a network ethernet port.
- Click the Power button to turn on the system.
(e) GoTo Room management
- You're ready to start and join meetings! Continue the setup by customizing the system's settings and integrating your Office 365, Microsoft Exchange, or Google calendar.