

Work with Microsoft Teams as an end-user in LogMeIn Resolve
As an end-user, you can create and update your tickets as well as add comments to them in Microsoft Teams.
As an end-user who submitted a ticket, the GoTo Resolve application keeps you up to date with its status by sending you messages about an agent being assigned to your ticket and comments being added to your ticket.
Create a ticket in the GoTo Resolve chat
- Open your chat with the GoTo Resolve bot by doing one of the following:
- If you have the GoTo Resolve app pinned on your left sidebar, select it.
- From the View more apps
 menu on the left sidebar, select GoTo Resolve.
 - Select the Chat menu on your left sidebar and find your chat with the GoTo Resolve bot.
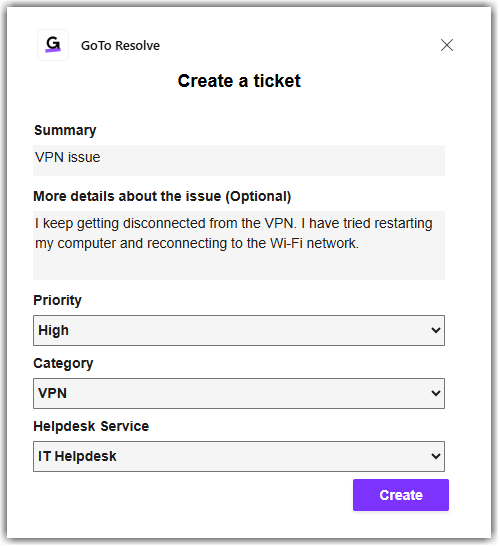
- Fill in the details of your ticket as follows, then select Create:
- Summary
- Provide a brief summary of your issue.
- More details about the issue (Optional)
- Optionally, include additional details that may help resolve your issue.
- Priority
- Set the priority of your issue, depending on how critical your issue is and how fast you need a solution.
- Category
- Optionally, select a category for your ticket that may help agents get a better picture of your issue.
- Helpdesk Service
- From the drop-down list, choose the support channel that is most relevant to your issue.
Results: Your ticket is created and sent to the support agents. The ticket is visible in the chat and on the My Tickets tab at the top of the chat window.
Edit your ticket
- Open your chat with the GoTo Resolve bot by doing one of the following:
- If you have the GoTo Resolve app pinned on your left sidebar, select it.
- From the View more apps menu on the left sidebar, select GoTo Resolve.
- Select the Chat menu on your left sidebar and find your chat with the GoTo Resolve bot.
- Find your ticket in the chat and select Edit ticket.
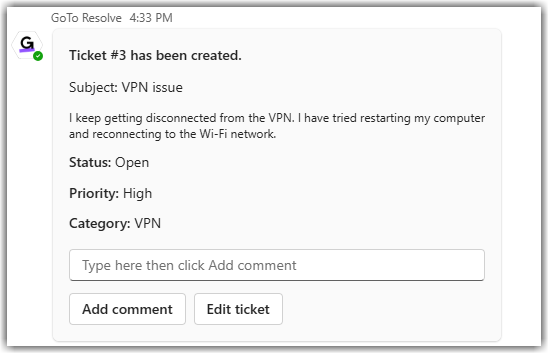
Results: Your updates are visible in the chat and are sent to the relevant support agents.
Add a comment to your ticket
- Open your chat with the GoTo Resolve bot by doing one of the following:
- If you have the GoTo Resolve app pinned on your left sidebar, select it.
- From the View more apps menu on the left sidebar, select GoTo Resolve.
- Select the Chat menu on your left sidebar and find your chat with the GoTo Resolve bot.
- Add a comment to your ticket by doing one of the following:
- Find your ticket in the chat, type your comment in the text box, then select Add comment.
- In the chat window, open the My Tickets tab at the top, then select the ticket to which you want to add a comment. Select Comments, then enter your comment in the text box and select Post Comment.
Tip: Select Open filters above your list of tickets to filter your tickets based on priority, status, service, and time range.
Results: Your comment is visible in the chat as a separate message and is sent to the relevant support agents.
View your submitted tickets
- Open your chat with the GoTo Resolve bot by doing one of the following:
- If you have the GoTo Resolve app pinned on your left sidebar, select it.
- From the View more apps menu on the left sidebar, select GoTo Resolve.
- Select the Chat menu on your left sidebar and find your chat with the GoTo Resolve bot.
- Navigate to the My Tickets tab at the top.
Tip: Select Open filters above your list of tickets to filter your tickets based on priority, status, service, and time range.
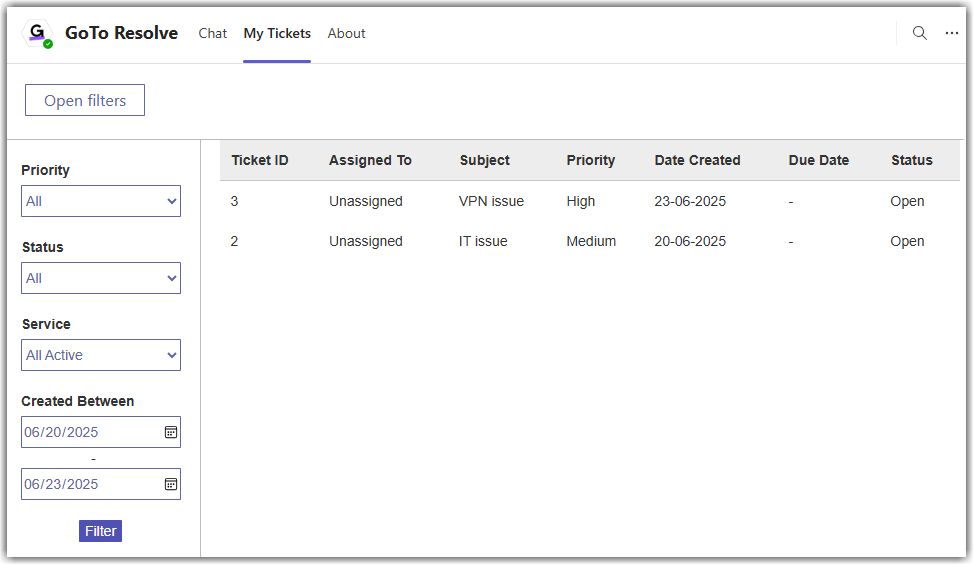
Results: Your submitted tickets are displayed. By selecting a ticket, you can add and view comments added to the ticket by support agents.
Participate in a remote support session with an agent
- Open your chat with the GoTo Resolve bot by doing one of the following:
- If you have the GoTo Resolve app pinned on your left sidebar, select it.
- From the View more apps menu on the left sidebar, select GoTo Resolve.
- Select the Chat menu on your left sidebar and find your chat with the GoTo Resolve bot.
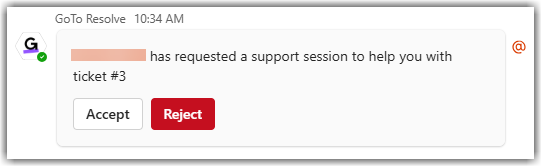
- From the support session request message, select Accept.
Result: The GoTo Resolve bot sends you a message with a link to download the LogMeIn Resolve support application.
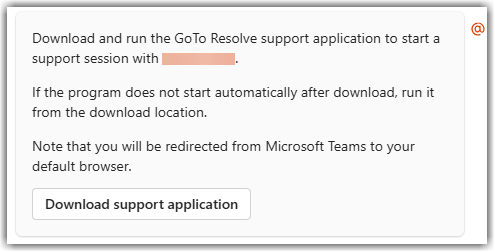
Results: The support session is established. As soon as the agent joins the session, your screen is shared with them.
