product icon

Getting Started: Add Helpdesk Services

You can learn from this article how to add helpdesk services to your account.

Remember: This feature is not available with a Free subscription. Check out which subscription you need to get the most of GoTo Resolve.

Watch this video on adding helpdesk services:

  1. Go to the Helpdesk page in GoTo Admin. Do one of the following:
    • Option 1:
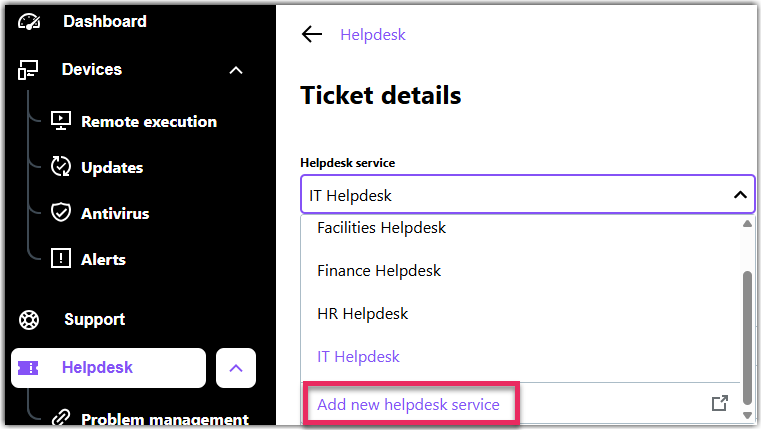
      • Go to the Helpdesk page and click the helpdesk service selector drop-down.
      • Choose Add new helpdesk service at the bottom of the list.
    • Option 2:
    • Option 3:

      While transferring a ticket, choose Add new helpdesk service at the bottom of the helpdesk service drop-down.

  2. On the Helpdesk services tab, select Add servicing group.
    Note: Some of the most common services are pre-defined for you.
  3. Name your service, add a description, and type the email address that you want to associate with the service.
    Tip: Any admin in your company (in Admin or Super admin role) can create a helpdesk service. However, the email address of that service depends on the following:
    • When an admin with a work email - a company email address - creates a helpdesk service, the service's email address will have the following format:

      <email address that you've defined>@<company>.gotoresolve.com.

      Let's say, you create a service, called IT Support and you add itsupportagent to its email address. In this case, the full email address will be itsupportagent@mycompany.gotoresolve.com

    • When an admin with a non-work email creates a helpdesk service, its email address will include random characters in the following format:

      <email address that you've defined>@<non-work domain>-<random number>.gotoresolve.com.

      For example, itsupportagent@gmail-1bbe8da349eb4945.gotoresolve.com.

      Since other GoTo Resolve users outside your company may create a helpdesk service with a Gmail account and name it the same way as you do, this random string helps uniquely identify the helpdesk service for your company.

    Important: Defining an email address lets your end-users create tickets from email. See How do I Create Tickets in the Console?
  4. On the Helpdesk services page, select the service that you have created.
  5. Select Add members in the top-right to add agents to your service.
  6. On the Ticket Categories tab, select Add ticket category.
    Tip: You can also access the ticket category page directly from the Console:
    • While creating a new ticket: on the Ticket details page of the Console, select Add categories at the bottom of the Category drop-down.
    • While transferring a ticket: on the Transfer ticket page of the Console, select Add categories at the bottom of the Select category drop-down.
  7. Name your category and Save it.
    Note: You can add multiple ticket categories to a service.
Article last updated: 24 April, 2023